In Montessori families, it is not unusual to see toddlers working in the kitchen. For some, knives are introduced at around 12-18 months of age, while for some, it’s introduced at around 2-3 years old. I understand the worry — so, if you are not yet ready to introduce the knife to your child or feel that your child still needs to do fine motor work before you can do actual slicing work, do remember that there are many other opportunities for your child to work with you in the kitchen. I have shared some in this blogpost.
If you have a toddler and looking at introducing knives for kitchen work, I am sharing here the ones we personally use.
* This post contains some affiliation links with Amazon. This means that if you purchase an item recommended through my link, I can possible receive Amazon credits — PS: This doesn’t cost you extra. *
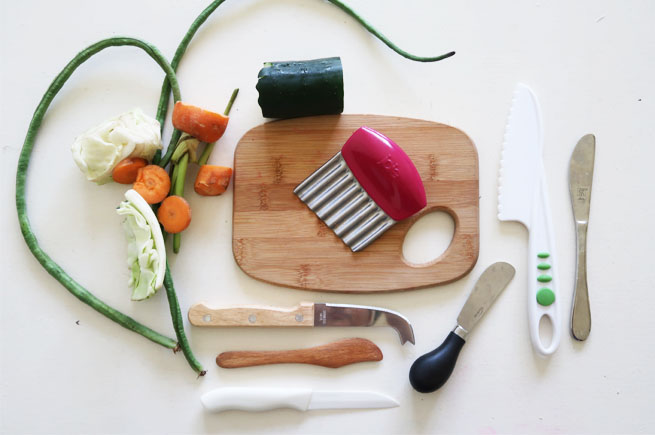
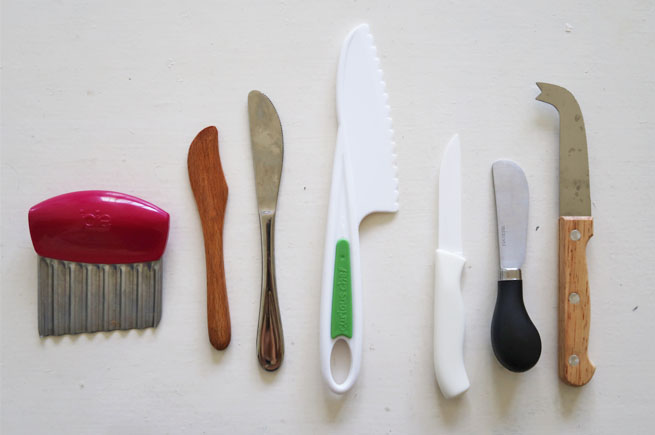
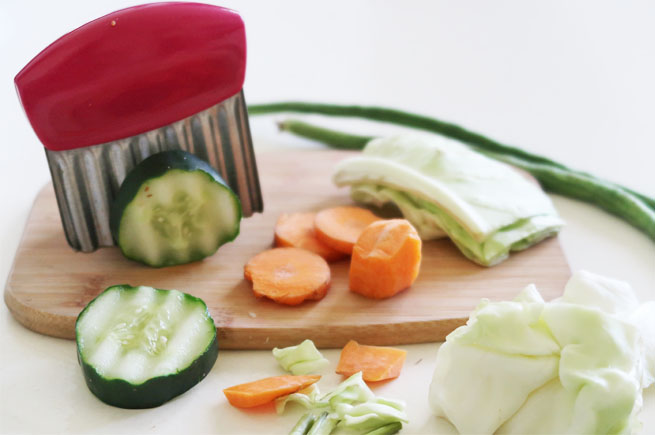
1. Wavy Cutter – this is the first knife for slicing that I introduced to my son. Love it because it’s perfect for my toddler’s little hands. He can really grip this and cut vegetables. It’s not that sharp, too, so it’s relatively the safest one in this set (except for butter knives and soft cheese knives, of course!) The only downside is it is challenging to use for round-shaped and thick vegetables like carrots and cucumber (have a tip regarding this below!). My son loves cutting string beans with this. Locally, you can possibly find this at a fair price at Cooks Exchange stores. I saw them selling this before. [Note: I actually really love this brand — they have a lot of small but beautifully designed things that work great with little hands! You can search HERE for more Joie kitchen products!]
2. Wooden Butter Knife – aside from really good price points, what I love about Japanese home stores like Daiso and Japan Home is that they carry a lot of kitchen stuff in small sizes. This was one of my finds. We use it for spreading butter. You can find something similar from Amazon HERE.
3. Small Table Knife – I got this from a kiddie cutlery set before, and we use it to cut bread or the like. You can find something similar from Amazon HERE, or HERE.
4. Curious Chef Knife Set – This set comes in 3 pcs, and we use the shortest one. When my son is having a hard time cutting vegetables with the wavy cutter, we replace it with this one. I thought it was still too large, until I made him try it. I don’t think it’s just the size, but also the design and make — my toddler can really use this properly without modeling from us. He discovered through this knife that to be able to cut a hard vegetable like carrot, he firs needed to press down the middle part of the knife on the vegetable, then put his other hand on the front part of the knife and press down again then together to achieve success in slicing. He loves using this knife. I do, too. By the way, you can get an orange version (slightly more expensive) HERE.
5. Ceramic Knife – We hardly use this knife…yet. I think it’s more appropriate for older children, because honestly, while it is small, it’s not instinctive for my toddler. What do I mean by that? Well, He cannot figure out yet which side is really for slicing, and it’s too small, which would make you think it’s perfect for toddler hands (I did!), but when he tried to put his hand on the front part to help him with the force on a harder vegetable — I got scared. His hand was too close to the slicing part of the knife. Why am I adding this here? Because I feel it’s the most accessible for us living in the Philippines. You can get Ceramic Knives from Daiso/ Japan Home Center/ Miniso and the like. I got ours from Miniso for only PHP 120, I think (and it comes with a peeler). It’s not sharp at first, but just like the others, I tried it on myself to see the kind of cut one could get (haha, yes, morbid but true) — slice it up and down a few times and you’ll get a cut. The upside is: as an adult, you’ll see how easy it is to slice with these. A preschooler or a child a bit older would benefit from this type of knife best. You can find something similar from Amazon HERE.
6. Cheese Knives – These are just knives we’ve always had. The shorter one is for soft cheese, while the longer one is for cheese that’s tougher to cut (depending on shape or if it’s the part with wax, etc). We don’t use them for anything but cheese. If you eat cheese at home, you can find something similar from Amazon HERE, or HERE.
That’s it.
Now, for the tips.
1. You don’t have to start with slicing work. You can do spreading work with butter knives – spreading jam, butter, etc.
2. You can start slicing with easy items – soft square bread, thin vegetables like onion leeks and string beans, soft fruits, boiled egg, soft tofu, etc.
3. For harder vegetables and fruits, you can already start by cutting the edges and making all bases flat before giving the pieces to the child (ex: cutting all the edges of a carrot so that whichever way your child places it, it will stand — curves are harder to work with). You may also steam them before asking your child to slice and cut — that way, it’s easier to cut them.
4. Expect a lot of food on the floor. What I do is I put a clean tray under my toddler’s stool, so that it catches whatever falls on the floor. Food saved, toddler satisfied.
5. Prepare extra than what your recipe calls for. For a toddler, everything is about the process. So if you toddler ends up throwing a bit of the ingredients (to see cause and effect perhaps), know that it’s not because your toddler wants to annoy you, but that s/he is learning about how everything works. That said, prepare extra in case you end up with items that you can no longer use for the actual cooking. Since we are vegetarians and this usually happens to our greens, we end up feeding it to our turtles.
6. As mentioned, for a toddler, it’s more about the process – so if your toddler doesn’t want to finish cutting everything you’ve prepared for him/her to cut, that’s okay. Just continue the work and use it as an opportunity to model.
7. My toddler in particular likes eating what he cuts (taste tester!), so it serves as my reason for always making sure we serve clean and fresh vegetables/fruits. I can’t always go for organic, but we do try to buy local and organic as much as possible. Or at the very least, I have the food soaked in baking soda or a vegetable/fruit wash before my toddler works on them.
8. Oh, and the most important of all — expect your finished product to be an interesting dish — trust me when I say there will be different cuts (styles, lengths, and sizes), so unless you need your dish to be uniform in the way they’re sliced, julienned, diced, etc — I say – let it go and enjoy your meal!
🙂


