My son was 9 months old when he first showed interest in doing posting work.
He tried out a peg material that he would see us fix, but we never directly taught him how to do. About a month after that, he showed readiness for the coin-box type of posting work.
Usually, they begin to show readiness for posting work from their late infancy to early toddler years. But, children are different, so just observe them and be ready to strike when they begin to show readiness. You can watch out for their repeated desire to take things in and out of containers, then you can present this kind of work, or do it just like what we did – we left the peg out for his exploration, and later on, when he was ready, he worked on it just like how we adults imagine the materials are for.
He loved my DIY coin box materials even after he was a year old. To be honest, it was probably one of his most favorite materials, or the one he’s really shown interest in the longest. And best of all, it cost me nothing at all. This is again a reminder for me to really observe my child before I get so excited with all the beautiful materials.
Lately, we’ve added a lot more kinds of DIY posting work for him, and in this blog, I will share them with you.

These DIY activities can be done with very little or no cost, too! Doing Montessori at home does not need to be expensive. At the end of the day, even with these DIY materials, it gets the job done: it gets them to work on their fine motor skills, it develops their concentration (and mental accuracy), it answers their need for making sense of the world through order, it teaches them control and coordination, it heightens their sensorial understanding (different objects sound differently when they fall, different objects have different tactile sensations, different objects have different sizes, etc), and it prepares them for Math through careful discrimination (understanding that some things are the same, and some are different, and that some things belong together, and that things have categories). These are just some of the indirect benefits, and I’m sure Maria Montessori thought of so much more.

If you position the items for posting on the left and the container on the right, you’re indirectly preparing them for reading, too.
So, here we go.
The consistent item here is a PICNIC CAN – because we just have a lot of these at home (ketchup flavor lover here, haha!). I also like that their lid is soft, making it easy to work with for carving (though round shapes are always challenging, so forgive the imperfections). We just use an Xacto knife to cut out the shapes, but especially for the round-shaped materials, if you have those fancy punchers that are similar in size with your materials for posting, they’re a way better option.

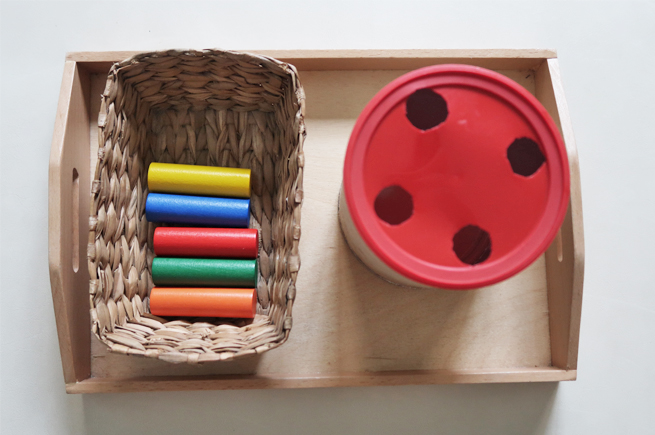
PICNIC CAN AND POKER CHIPS
We have poker chips at home so that’s what we used. But you can also use these: huge buttons (plastic buttons, or those native coconut buttons – bought a bunch of them from Divisoria a long time ago) | flat coasters | relatively large play coins or actual coins (just make sure your child doesn’t munch on the real coins) | smaller lids like plastic bottle lids or lids of other chips like Pringles | tapes (washi or masking, etc)| rings from your stacking rings toy, or teethers | old credit cards or IDs
PICNIC CAN AND PEGS
This is a material P already has, so I just used it for this activity, too. You may also use corks, peg dolls, those mini toiletry bottles you get from hotel room, markers, dowels, jumbo straws (like the reusable bamboo straws), candles, jumbo crayons (the washable type may be a better option), jumbo paintbrushes, massage sticks, clay rolling pins, or a toothbrush.
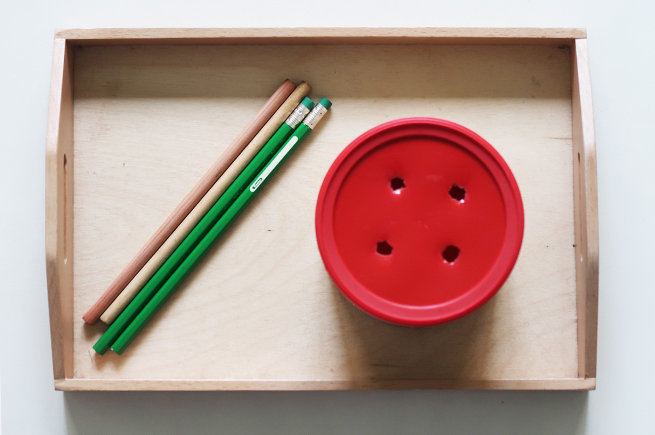

PICNIC CAN AND SMALL HOLES
The small holes are for when they’re already used to the bigger holes since it requires finer movement. There are a lot of small things you can use, but we’ve chosen to go with fake flowers and pencils. You can use the regular-sized straws (we’re trying to lessen our plastic consumption so we did not go with this option anymore – if you have the reusable steels ones – you can use those!), or chopsticks (or barbecue sticks – with the sharp edge cut of course!).You can also work with popsicle sticks or the regular-sized crayons, or those tiny paintbrushes. Eventually, you can move to smaller ones like cotton buds and toothpicks, or more brittle ones like uncooked noodles.

PICNIC CAN AND BALLS
We only make use of what we have, but really, your options here are endless! I use the wooden balls that come with his rolling balls toy, but you can also use table tennis balls, Christmas balls, wooden balls (we have a lot of those from Kamuning market), golf balls, or whatever balls you have at home!
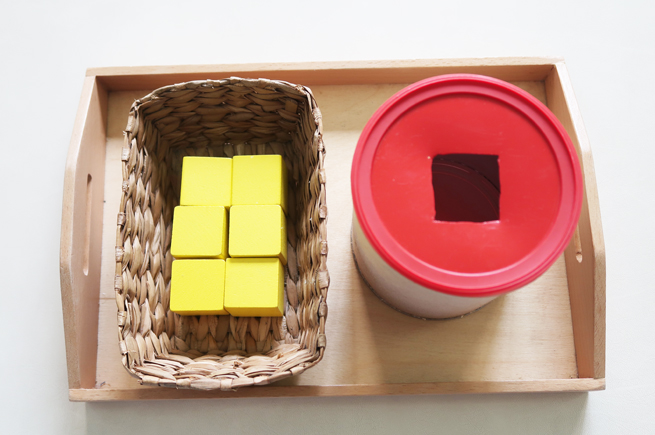

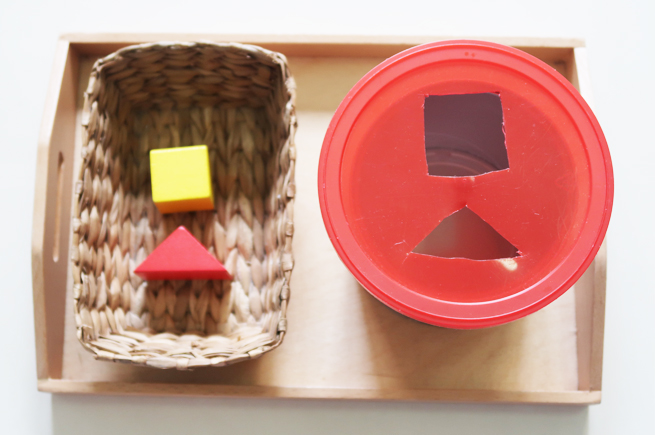
PICNIC CAN AND BASIC SHAPES
Since we already have one for a round shape using balls, I also made one for a cube. P’s set of unit blocks (which I think is a staple in many households) comes with triangular prisms and cubes. So I just used those instead of buying a shape sorter box. Actually, the usual shape sorters are usually very “noisy” – too many shapes in such a little box. For beginners, it’s really not recommended because it can be too overwhelming, or too stimulating that it really lessens the child’s concentration. I was looking at a simple shape sorter in Amazon before – it’s wooden and nice – and has very few shapes (I think only 2 or 3 in total, and only one per side). I wanted to buy it but I couldn’t justify the price. When I saw my son’s unit blocks, I was like – “Oh my gosh! Why did I not think of doing a DIY version sooner?” So anyway, I did.
You can also use what you have at home (like a small box, or a star/heart-shaped container (or lid), or baking/clay molds).
So there. These really cost nothing for many of us, since they’re items we probably already have at home. To help you get started, look at your child’s existing toys and materials and see which ones can be useful for this activity. And then go through your office/school/kitchen items to see which ones are useful, too. My alternative recommendations are just some of the many possibilities – I’m sure there are a lot more options you can work with once you take a look at what you have at home.
Then once you have evaluated your child’s toys, see what other activities you can use them for and write them down – that way, you can minimize your spendings (your space will thank you for it) and maximize your materials’ worth.
SOME MORE TIPS:
If you’ve presented something to your child because you’ve noticed that they’re beginning to do in-out work but your child doesn’t seem ready for exact shape sorting yet, you can always start with a bigger container and a much smaller item to post. You can remove the Picnic can’s lid first, and choose small balls like table tennis balls as the partner. That way, you answer their need for in-out movement without having to frustrate them so much.
For pieces that fit smaller holes, you can do the same thing and introduce it it with bigger holes first.

Also, for beginners, it’s better to present items that don’t have different edges (like a paintbrush – one side is just rounded, while the other has bristles). The simpler the item, the better. This way, you allow them to concentrate more on the posting work, rather than figuring out which is the correct side. Round objects are best for starters, because the shape remains the same no matter how they’re positioned.

And then, when you think they’re ready for something more challenging, you can work with materials that have different edges, and you can also add more shapes in one lid (2-3 shapes).
Lastly, do not feel discouraged when your child is not doing things the exact way you expect him/her to. This is part of their learning process.


Hope this was helpful. Have fun with your DIY!


5 Comments
Thank you for all these inspirations Paula. I love to DIY too and I am trying to Montessori at home. I am going to do the one with pencil because my baby loves his color pens and he’s trying to put them inside other container. 🙂
Thank you for this tips. Now i can remove imbucare. It has been on my amazon cart for 2 months already.
So helpful!!! ❤️
This is so uplifting! Because I often gets disheartened by so many beautiful montessori materials that are too pricey for me to buy. I love DIYs and coming from you it makes me more motivated to always think outside the box. Follow the child and make use of what we have as long as it serves the purpose. Thanks again for this. God bless.
Awww thank you for your message, Danica! Yes to looking for things that serve the purpose. 🙂